Create a custom design for the Enterprise Theme
Applicable: | This tutorial applies to Confluence 5.0 and higher. |
|---|---|
Level of experience: | Beginner. |
Time estimate: | It should take you less than 1 hour to complete this tutorial. |
| Sources: |
Overview of the tutorial
This tutorial shows you how to create a very simple design plugin for the Enterprise Theme. This tutorial does not require writing any Java classes. To complete this tutorial, you should have installed the Atlassian SDK and worked through the Atlassian Plugin SDK tutorial.
Plugin source
If you want to skip ahead or check your work when you finish, you can find the plugin source code on Bitbucket. Bitbucket serves a public Git repository containing the tutorial's code. Alternatively, you can download the source as a ZIP archive. To clone the repository, issue the following command:
git clone https://bitbucket.org/bitvoodoo/design-tutorial.git
Step 1. Create the plugin project and prune the skeleton
In this step, you'll generate skeleton code for your plugin. Since you won't need many of the skeleton files, you also delete those unused files in this step.
- Open a terminal on your machine and navigate to your Eclipse workspace directory.
If you aren't using Eclipse, you do this step in any directory where you normally keep your plugin code. Enter the following command to create a plugin skeleton:
atlas-create-confluence-plugin
The
atlas-commands are part of the Atlassian Plugin SDK, and automate some of the work of plugin development for you.When prompted, enter the following information to identify your plugin:
group-id
ch.bitvoodoo.confluence.plugins.designsartifact-id
tutorialversion
1.0-SNAPSHOTpackage
ch.bitvoodoo.confluence.plugins.designs.tutorial- Confirm your entries when prompted.
The SDK creates your project skeleton and puts it in a tutorial directory. Change to the tutorial directory created by the previous step.
Delete the test directories.
Setting up blueprint testing is not part of this tutorial. Use the following command to delete the generated test skeleton:
rm -rf ./src/test/java
rm -rf ./src/test/resources/
Delete the unneeded Java class files.
A design doesn't require any Java code.
rm ./src/main/java/ch/bitvoodoo/confluence/plugins/designs/tutorial/*.java
- Edit the
src/main/resources/atlassian-plugin.xmlfile. Remove the generated
myPluginComponentcomponent declaration and the web-resource module.HTML/XML<!-- add our web resources --> <web-resource key="tutorial-resources" name="tutorial Web Resources"> <dependency>com.atlassian.auiplugin:ajs</dependency> <resource type="download" name="tutorial.css" location="/css/tutorial.css"/> <resource type="download" name="tutorial.js" location="/js/tutorial.js"/> <resource type="download" name="images/" location="/images"/> <context>tutorial</context> </web-resource> <!-- publish our component --> <component key="myPluginComponent" class="com.example.plugins.tutorial.confluence.simplebp.MyPluginComponentImpl" public="true"> <interface>com.example.plugins.tutorial.confluence.simplebp.MyPluginComponent</interface> </component>atlassian-plugin.xml after these changes
XML<atlassian-plugin key="${project.groupId}.${project.artifactId}" name="${project.name}" plugins-version="2"> <plugin-info> <description>${project.description}</description> <version>${project.version}</version> <vendor name="${project.organization.name}" url="${project.organization.url}" /> <param name="plugin-icon">images/pluginIcon.png</param> <param name="plugin-logo">images/pluginLogo.png</param> </plugin-info> <!-- add our i18n resource --> <resource type="i18n" name="i18n" location="tutorial"/> <!-- import from the product container --> <component-import key="applicationProperties" interface="com.atlassian.sal.api.ApplicationProperties" /> </atlassian-plugin>- Close and save the
atlassian-plugin.xmlfile.
Now is a good point to import the project into your IDE
Step 2. Run your plugin and install the design add-on
At this point, you haven't actually done anything but create a skeleton plugin. You can run that skeleton in Confluence anyway. In this step, you do just that. Then, you'll use the export function of the Enterprise Theme add-on to create a design definition.
- Use the atlas-run command to start a local Confluence instance.
Run the following command:
atlas-run
This command takes a minute or so to run. It builds your plugin code, starts a Confluence instance, and installs your plugin. When the process has finished, you will see many status lines on your screen concluding with something like the following:
[INFO] [talledLocalContainer] INFO: Starting Coyote HTTP/1.1 on http-1990
[INFO] [talledLocalContainer] Tomcat 6.x started on port [1990]
[INFO] confluence started successfully in 132s at http://localhost:1990/confluence
[INFO] Type Ctrl-D to shutdown gracefully
[INFO] Type Ctrl-C to exit
You'll see the output includes a URL for the Confluence instance.
- Log into the instance as user
adminusing a password ofadmin.
The Confluence Dashboard appears. - Choose Confluence Admin by clicking ⚙ > Add-ons.
The system displays the Manage Add-ons page. - Open a separate browser window or tab.
- Navigate to the Marketplace listing for the Enterprise Theme.
- Download the latest version of the add-on's jar by pressing Download Now.
Make a note of where the file downloaded to. - Switch back to your still running Confluence Manage Add-ons page.
- Press the Upload Add-on button.
The Upload Add-on dialog displays. - Press Choose File button.
- Navigate to and select the source editor add-on JAR you just downloaded.
- Press Upload.
The system displays a success dialog.
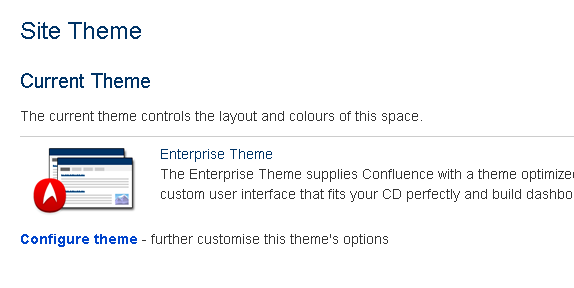
- Apply the Enterprise Theme as global theme
- Leave Confluence running in your browser.
Step 3 Create an Enterprise Theme Export of your color setting
You can use the Design Editor to define a color scheme for your design. After you've defined the color scheme, you can create an export of these settings and apply them to our add-on.
- You need to export these two configurations or use the export attached in our bitbucket project in the
resources/designfolder.- Colour Scheme (this is the Confluence colour scheme)
- Theme Configurations

- Save this export as tutorial.xml in the folder
src/main/resources/design/.
Step 4 Add the additional resources to your project
Before we add the design module to the plugin, the design configuration needs to be copied into the add-on and we can add an optional icon displayed in the design listing.
- Copy the design export into the folder
src/main/resources/design. - Save an optional design image to your project's
src/main/resources/imagesdirectory.
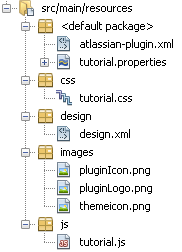
- At this point, your project's
src/main/resourcesdirectory should contain the following files:
Step 5. Add the modules to the atlassian-plugin.xml file
Each design relies on one design module and one or more design-web-resources.
| Module | Purpose |
|---|---|
design | Describes the design, connected to a design definition. |
design-web-resource | Web resources, that are only loaded, if the design is active in the current context (global or space). |
Add the modules to the file, by going to your plugin's project root and doing the following:
- Edit the
src/main/resources/atlassian-plugin.xmlfile. Add a
designmodule for your custom design.HTML/XML<design key="tutorial" name="Tutorial Design" configuration="design/design.xml" > <description>A design for the tutorial</description> <resource name="themeicon.gif" type="download" location="images/themeicon.png"> <property key="content-type" value="image/png"/> </resource> </design>Add a design-web-resource module for your design.
HTML/XML<!-- add our web resources --> <design-web-resource key="tutorial-resources" name="Tutorial Design Web Resources"> <dependency>com.atlassian.auiplugin:ajs</dependency> <resource type="download" name="tutorial.css" location="/css/tutorial.css"/> <resource type="download" name="tutorial.js" location="/js/tutorial.js"/> <design>${project.groupId}.${project.artifactId}:tutorial</design> </design-web-resource>Check your work.
- Save and close your
atlassian-plugin.xmlfile.
Step 6. Build your changes and see your design in action
Now, you are ready to build your plugin and see the design in action.
- Use the atlas-cli command to install the add-on again in your running Confluence instance.
Run the following command:
atlas-cli
This command takes a minute or so to run. It builds your plugin code, and the ends up in this new console:
[INFO] --- maven-amps-dispatcher-plugin:5.0.3:cli (default-cli) @ tutorial ---
[INFO] Using Maven version: Apache Maven 3.2.1 (ea8b2b07643dbb1b84b6d16e1f08391b666bc1e9; 2014-02-14T18:37:52+01:00)
[INFO] Opening port 4330 for socket cli access
[INFO] Waiting for commands...
maven>
- With the command pi you can just install the add-on in your running instance.
- Visit the designs configuration page and check if your design appears in the design list.
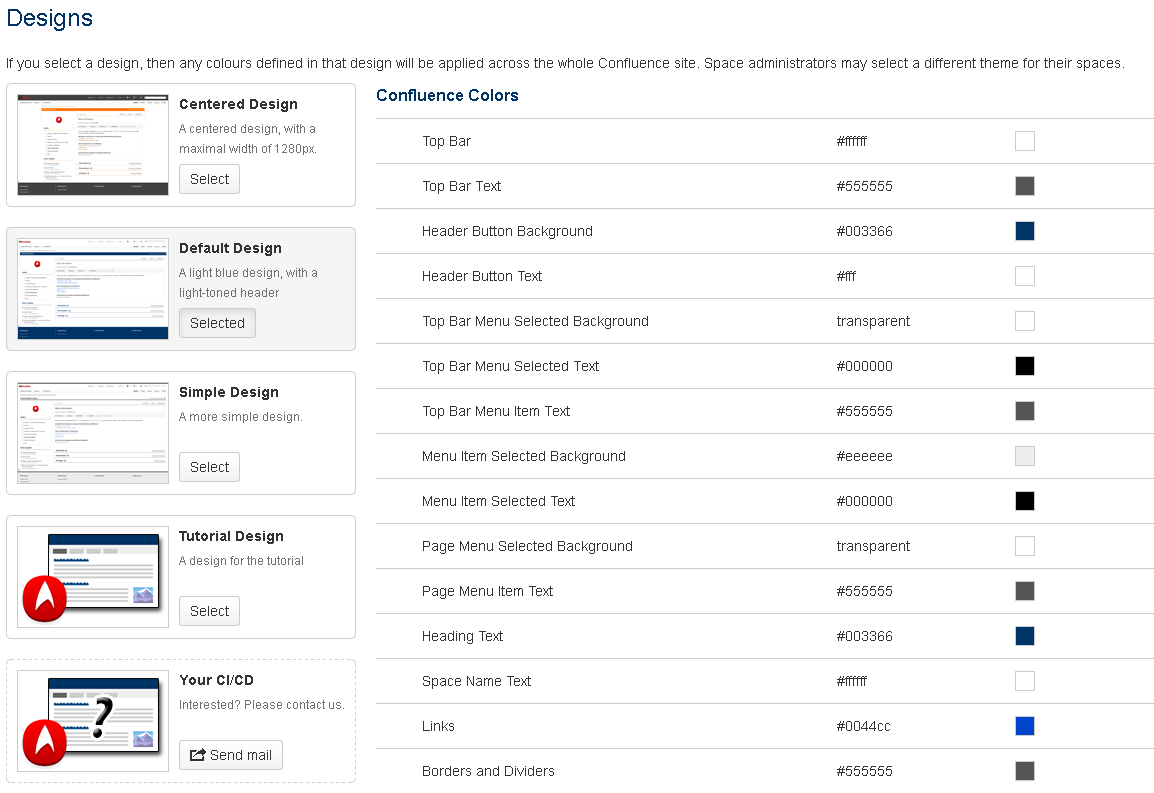
- If you now apply your design, your previously defined colors will be set and your additional javascript and css definitions will be loaded.